

How to Install Kubernetes Cluster on Ubuntu 22.04 (Step-by-Step Guide


Introduction
Kubernetes is a powerful container orchestration platform used for automating the deployment, scaling, and management of containerized applications. In this guide, we will walk you through the step-by-step process of installing Kubernetes on Ubuntu 22.04. This cluster configuration includes a master node and worker nodes, allowing you to harness the full power of Kubernetes.
Kubernetes Nodes
In a Kubernetes cluster, you will encounter two distinct categories of nodes:
Master Nodes: These nodes play a crucial role in managing the control API calls for various components within the Kubernetes cluster. This includes overseeing pods, replication controllers, services, nodes, and more.
Worker Nodes: Worker nodes are responsible for providing runtime environments for containers. It’s worth noting that a group of container pods can extend across multiple worker nodes, ensuring optimal resource allocation and management.
Prerequisites
Before diving into the installation, ensure that your environment meets the following prerequisites:
An Ubuntu 22.04 system.
Privileged access to the system (root or sudo user).
Active internet connection.
Minimum 2GB RAM or more.
Minimum 2 CPU cores (or 2 vCPUs).
20 GB of free disk space on /var (or more).
Step 1: Update and Upgrade Ubuntu (all nodes)
Begin by ensuring that your system is up to date. Open a terminal and execute the following commands:
sudo apt update
sudo apt upgrade
Step 2: Disable Swap (all nodes)
To enhance Kubernetes performance, disable swap and set essential kernel parameters. Run the following commands on all nodes to disable all swaps:
sudo swapoff -a
sudo sed -i '/ swap / s/^\(.*\)$/#\1/g' /etc/fstab
Step 3: Add Kernel Parameters (all nodes)
Load the required kernel modules on all nodes:
sudo tee /etc/modules-load.d/containerd.conf <<EOF
overlay
br_netfilter
EOF
sudo modprobe overlay
sudo modprobe br_netfilter
Configure the critical kernel parameters for Kubernetes using the following:
sudo tee /etc/sysctl.d/kubernetes.conf <<EOF
net.bridge.bridge-nf-call-ip6tables = 1
net.bridge.bridge-nf-call-iptables = 1
net.ipv4.ip_forward = 1
EOF
Then, reload the changes:
sudo sysctl --system
Step 4: Install Containerd Runtime (all nodes)
We are using the containerd runtime. Install containerd and its dependencies with the following commands:
sudo apt install -y curl gnupg2 software-properties-common apt-transport-https ca-certificates
Enable the Docker repository:
sudo curl -fsSL https://download.docker.com/linux/ubuntu/gpg | sudo gpg --dearmour -o /etc/apt/trusted.gpg.d/docker.gpg
sudo add-apt-repository "deb [arch=amd64] https://download.docker.com/linux/ubuntu $(lsb_release -cs) stable"
Update the package list and install containerd:
sudo apt update
sudo apt install -y containerd.io
Configure containerd to start using systemd as cgroup:
containerd config default | sudo tee /etc/containerd/config.toml >/dev/null 2>&1
sudo sed -i 's/SystemdCgroup \= false/SystemdCgroup \= true/g' /etc/containerd/config.toml
Restart and enable the containerd service:
sudo systemctl restart containerd
sudo systemctl enable containerd
Step 5: Add Apt Repository for Kubernetes (all nodes)
Kubernetes packages are not available in the default Ubuntu 22.04 repositories. Add the Kubernetes repositories with the following commands:
curl -s https://packages.cloud.google.com/apt/doc/apt-key.gpg | sudo gpg --dearmour -o /etc/apt/trusted.gpg.d/kubernetes-xenial.gpg
sudo apt-add-repository "deb http://apt.kubernetes.io/ kubernetes-xenial main"
Step 6: Install Kubectl, Kubeadm, and Kubelet (all nodes)
After adding the repositories, install essential Kubernetes components, including kubectl, kubelet, and kubeadm, on all nodes with the following commands:
sudo apt update
sudo apt install -y kubelet kubeadm kubectl
sudo apt-mark hold kubelet kubeadm kubectl
Step 7: Initialize Kubernetes Cluster with Kubeadm (master node)
With all the prerequisites in place, initialize the Kubernetes cluster on the master node using the following Kubeadm command:
sudo kubeadm init
root@master:~# sudo kubeadm init
[init] Using Kubernetes version: v1.28.3
[preflight] Running pre-flight checks
[preflight] Pulling images required for setting up a Kubernetes cluster
[preflight] This might take a minute or two, depending on the speed of your internet connection
[preflight] You can also perform this action in beforehand using 'kubeadm config images pull'
W1102 19:06:53.288119   10840 checks.go:835] detected that the sandbox image "registry.k8s.io/pause:3.6" of the container runtime is inconsistent with that used by kubeadm. It is recommended that using "registry.k8s.io/pause:3.9" as the CRI sandbox image.
[certs] Using certificateDir folder "/etc/kubernetes/pki"
[certs] Generating "ca" certificate and key
[certs] Generating "apiserver" certificate and key
[certs] apiserver serving cert is signed for DNS names [kubernetes kubernetes.default kubernetes.default.svc kubernetes.default.svc.cluster.local master] and IPs [10.96.0.1 146.190.135.86]
[certs] Generating "apiserver-kubelet-client" certificate and key
[certs] Generating "front-proxy-ca" certificate and key
[certs] Generating "front-proxy-client" certificate and key
[certs] Generating "etcd/ca" certificate and key
[certs] Generating "etcd/server" certificate and key
[certs] etcd/server serving cert is signed for DNS names [localhost master] and IPs [146.190.135.86 127.0.0.1 ::1]
[certs] Generating "etcd/peer" certificate and key
[certs] etcd/peer serving cert is signed for DNS names [localhost master] and IPs [146.190.135.86 127.0.0.1 ::1]
[certs] Generating "etcd/healthcheck-client" certificate and key
[certs] Generating "apiserver-etcd-client" certificate and key
[certs] Generating "sa" key and public key
[kubeconfig] Using kubeconfig folder "/etc/kubernetes"
[kubeconfig] Writing "admin.conf" kubeconfig file
[kubeconfig] Writing "kubelet.conf" kubeconfig file
[kubeconfig] Writing "controller-manager.conf" kubeconfig file
[kubeconfig] Writing "scheduler.conf" kubeconfig file
[etcd] Creating static Pod manifest for local etcd in "/etc/kubernetes/manifests"
[control-plane] Using manifest folder "/etc/kubernetes/manifests"
[control-plane] Creating static Pod manifest for "kube-apiserver"
[control-plane] Creating static Pod manifest for "kube-controller-manager"
[control-plane] Creating static Pod manifest for "kube-scheduler"
[kubelet-start] Writing kubelet environment file with flags to file "/var/lib/kubelet/kubeadm-flags.env"
[kubelet-start] Writing kubelet configuration to file "/var/lib/kubelet/config.yaml"
[kubelet-start] Starting the kubelet
[wait-control-plane] Waiting for the kubelet to boot up the control plane as static Pods from directory "/etc/kubernetes/manifests". This can take up to 4m0s
[apiclient] All control plane components are healthy after 8.002720 seconds
[upload-config] Storing the configuration used in ConfigMap "kubeadm-config" in the "kube-system" Namespace
[kubelet] Creating a ConfigMap "kubelet-config" in namespace kube-system with the configuration for the kubelets in the cluster
[upload-certs] Skipping phase. Please see --upload-certs
[mark-control-plane] Marking the node master as control-plane by adding the labels: [node-role.kubernetes.io/control-plane node.kubernetes.io/exclude-from-external-load-balancers]
[mark-control-plane] Marking the node master as control-plane by adding the taints [node-role.kubernetes.io/control-plane:NoSchedule]
[bootstrap-token] Using token: f1h95l.u4nkex9cw8d0g63w
[bootstrap-token] Configuring bootstrap tokens, cluster-info ConfigMap, RBAC Roles
[bootstrap-token] Configured RBAC rules to allow Node Bootstrap tokens to get nodes
[bootstrap-token] Configured RBAC rules to allow Node Bootstrap tokens to post CSRs in order for nodes to get long term certificate credentials
[bootstrap-token] Configured RBAC rules to allow the csrapprover controller automatically approve CSRs from a Node Bootstrap Token
[bootstrap-token] Configured RBAC rules to allow certificate rotation for all node client certificates in the cluster
[bootstrap-token] Creating the "cluster-info" ConfigMap in the "kube-public" namespace
[kubelet-finalize] Updating "/etc/kubernetes/kubelet.conf" to point to a rotatable kubelet client certificate and key
[addons] Applied essential addon: CoreDNS
[addons] Applied essential addon: kube-proxy

Your Kubernetes control-plane has initialized successfully!

To start using your cluster, you need to run the following as a regular user:

  mkdir -p $HOME/.kube
  sudo cp -i /etc/kubernetes/admin.conf $HOME/.kube/config
  sudo chown $(id -u):$(id -g) $HOME/.kube/config

Alternatively, if you are the root user, you can run:

  export KUBECONFIG=/etc/kubernetes/admin.conf

You should now deploy a pod network to the cluster.
Run "kubectl apply -f [podnetwork].yaml" with one of the options listed at:
  https://kubernetes.io/docs/concepts/cluster-administration/addons/

Then you can join any number of worker nodes by running the following on each as root:

kubeadm join 146.190.135.86:6443 --token f1h95l.u4nkex9cw8d0g63w \
        --discovery-token-ca-cert-hash sha256:6d15f2a79bdb38d1666af50c85f060b9fadc73f13c932e0e2a9eeef08f51f91a
After the initialization is complete make a note of the kubeadm join command for future reference.
Run the following commands on the master node:
mkdir -p $HOME/.kube
sudo cp -i /etc/kubernetes/admin.conf $HOME/.kube/config
sudo chown $(id -u):$(id -g) $HOME/.kube/config
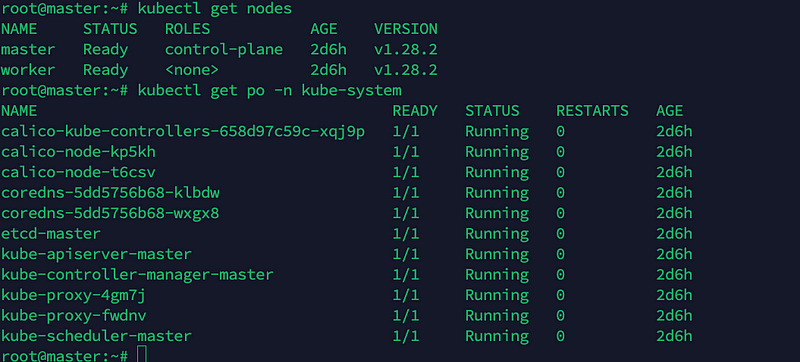
Next, use kubectl commands to check the cluster and node status:
kubectl get nodes

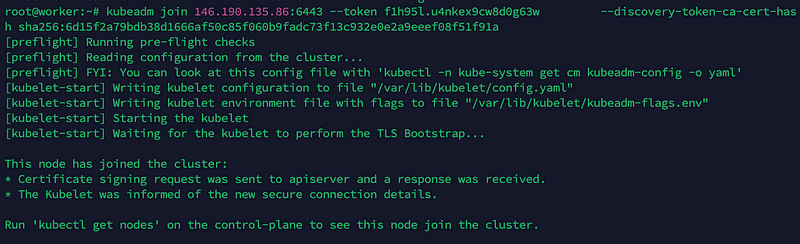
Step 8: Add Worker Nodes to the Cluster (worker nodes)
On each worker node, use the kubeadm join command you noted down earlier:
kubeadm join 146.190.135.86:6443 --token f1h95l.u4nkex9cw8d0g63w --discovery-token-ca-cert-hash sha256:6d15f2a79bdb38d1666af50c85f060b9fadc73f13c932e0e2a9eeef08f51f91a
Step :9 Install Kubernetes Network Plugin (master node)
To enable communication between pods in the cluster, you need a network plugin. Install the Calico network plugin with the following command from the master node:
kubectl apply -f https://raw.githubusercontent.com/projectcalico/calico/v3.25.0/manifests/calico.yaml
Step 10: Verify the cluster and test (master node)
Finally, we want to verify whether our cluster is successfully created.
kubectl get pods -n kube-system
kubectl get nodes
Step 11: Deploy test application on cluster (master node)
kubectl run nginx --image=nginx
